Setting Up Your Site and Essay
This is Part 1 of the student guide to publishing on the Campus History site. Your course syllabus explains the assignment, grading, due dates, and reflection requirements. The guide only covers the site workflow, in three parts:
- Setting up your site and essay (this page): make your own copy of the site, start your essay folder, and add your header image.
- Working on your essay: finish the metadata, write, add images and pull quotes, and check your work.
- Submitting your essay: go through the checklist and open a pull request.
Due Tuesday: Your Own Working Copy of the Site
By Tuesday, do these five things. Each step links to its section of this guide.
- Make your own copy of the site. Fork the repository.
- Get your copy working as a website. Turn on GitHub Pages and open your preview site.
- Duplicate the starter folder. Copy
starter-essay-simpleand rename the copy with your folder name. This becomes your essay folder. - Add an image of your building. Find a picture of your building and upload it into your essay folder.
- Point the metadata at your image. In the metadata at the top of your
index.md(sometimes called the YAML header), setheader-image:to your image’s exact filename and fill in the other marked lines, including acategory:from the list of categories. See Change the Top ofindex.md.
You are done when your essay shows up on your preview site’s Essays page, https://YOUR-USERNAME.github.io/campus-history/directory/, with your building’s picture on its card. Stop there. Parts 2 and 3 of this guide cover writing and submitting the essay, which come later.
Before You Start
- Create or sign in to a GitHub account.
- Choose a topic according to your course assignment.
- Check with your instructor before duplicating a topic already claimed by another student.
- Open the Campus History repository.
Fork the Repository
In GitHub, a “fork” (like a fork in the road) is your own copy of the Campus History repository. You can edit your own copy without changing the “official” site until you are ready.
- Go to the Campus History repository.
-
Click
Forkin the upper-right corner.
The
Forkbutton, near the top right of the page. - Keep the default settings and click
Create fork. - After GitHub creates the fork, make sure the URL includes your GitHub username.
Bookmark two pages:
- Your repository:
https://github.com/YOUR-USERNAME/campus-history - Your preview site, once GitHub Pages is enabled:
https://YOUR-USERNAME.github.io/campus-history
Preview Your Work
Your fork can generate its own preview version of the website. Use that preview to check page content, links, images, and formatting before submitting. Fork previews can behave a little differently from the public Campus History site because they live under your GitHub username, so do not change _config.yml or site-wide settings unless your instructor specifically tells you to.
- In your fork, click
Settings. - Click
Pagesin the left sidebar. - Under
Build and deployment, chooseDeploy from a branch. - Select the
masterbranch and the/ (root)folder. - Click
Save. - Wait a minute or two, then return to
Settings>Pagesand open the published site link.
GitHub Pages takes about a minute to rebuild your site and show your latest changes.
Start From a Starter Essay
All essays live in the essays folder. Each essay has its own folder and an index.md file inside that folder. The easiest way to begin is to copy one of the starter essay folders and rename it for your topic.
Use one of these:
starter-essay-simple— best for most essays. It already contains everything a finished essay needs: a lead paragraph, subheadings, captioned images, a carousel, and a bibliography. Replace the placeholder text and images and you have a complete page.starter-essay-advanced— a parts catalog containing one working example of every component the site offers, including pullquotes, image grids, before/after sliders, footnotes, banner images, and full-screen scrollstory sections. Start here only if you want the fuller set, and delete every component you do not use.
Choose a Folder Name
Pick your folder name before you copy anything. It becomes part of your essay’s web address, as in /essays/mesa-vista-hall/.
Folder names must be:
- all lowercase
- hyphenated instead of spaced
- short but recognizable
- new: no folder in
essayscan already have that name - exactly the same wherever you refer to them
The folders already in essays show the pattern: duck-pond, maxwell-museum, sara-raynolds-hall. Check that list before you name yours. If your topic already has a folder, add a word that sets yours apart, such as duck-pond-1970s. Even mesa-vista-hall, the example on this page, is taken by the site’s demo essay. Two essays in the same folder would overwrite each other.
Copy the Starter Folder
Do not edit the starter folder itself. Duplicate it, then rename the copy.
You will do this in GitHub’s web editor, which runs in your browser. Use a laptop or desktop computer: the editor depends on right-clicking and does not work well on a phone or tablet (many tablets are fine, but quite hard to use if you’re not used to this sort of thing). On a Mac trackpad, right-click by clicking with two fingers, or by holding Control while you click.
- Open your fork. Go to
https://github.com/YOUR-USERNAME/campus-history. Check that the address shows your username, notamaranth-unm. If it showsamaranth-unm, you are in the main repository, and you cannot save changes there. - Open the editor. In your browser’s address bar, change
github.comtogithub.devso the address readshttps://github.dev/YOUR-USERNAME/campus-history, then pressEnter. Sign in if GitHub asks. The editor opens with a list of files down the left side. - Open the
essaysfolder. Clickessaysin the file list. It expands into a list of folders, one for each essay, in alphabetical order. Findstarter-essay-simpleunder S. - Copy the starter. Right-click
starter-essay-simpleand chooseCopy. Nothing visible happens. That is normal. - Paste it into
essays. Scroll up and right-click the wordessaysitself, not any folder inside it, and choosePaste. A new folder calledstarter-essay-simple copyappears in the list underessays. If it does not, the copy went somewhere else: see the fixes below. - Rename the copy. Right-click
starter-essay-simple copy, the one withcopyin its name, and chooseRename. Delete the whole name, type your folder name, and pressEnter. - Check the folder list.
essaysshould now contain bothstarter-essay-simpleand your new folder. Click your folder to open it. It should holdindex.mdand three sample images.index.mdis your essay, so keep that filename. - Check the list of changes. Click the Source Control icon in the bar on the far left, the one showing a small number. Under
Changesyou should see four files:index.mdand the three sample images, each with your folder name in gray beside it. If any of them showsstarter-essay-simpleinstead, or has aDbeside it, stop and use the fixes below. - Save to GitHub. Type
Start my essayin theMessagebox above the list of changes, then clickCommit & Push. - Confirm it worked. Go back to your fork on github.com and open the
essaysfolder. Your folder should be there. After a minute or two, your preview site shows your page at/essays/your-folder-name/.
Nothing you change in the editor reaches your fork or your preview site until you commit. Repeat steps 8 and 9 each time you finish a round of changes.
If Something Goes Wrong
If you have not committed yet, the easiest fix is to start over. In Source Control, hover over the word Changes and click the curved-arrow icon, Discard All Changes, then confirm. Everything goes back to how it was at your last commit, and you can start again from step 4.
- The copy landed inside
starter-essay-simpleor another essay’s folder. You right-clicked a folder other thanessayswhen you pasted. Discard your changes, copy again, and this time right-click the wordessaysto paste. Pasteis grayed out or missing. You right-clicked blank space, or the copy did not take. Right-clickstarter-essay-simple, chooseCopyagain, and then right-clickessays.starter-essay-simplehas disappeared. You renamed the starter instead of the copy. Discard your changes and start again from step 4.- Your folder name still contains a space or the word
copy. Right-click it, chooseRename, and fix it. - You already committed a mistake. Fix it in the editor so the folders look right again, then commit again. Your pull request only shows how things end up, not every step along the way. If you are not sure how to put things back, ask your instructor before you go further.
Make the Page Yours
Your copy is still the starter, with its sample pictures and placeholder text. The first round of work replaces the top of the page: your title, your name, a category, and one image of your topic. Leave the rest of the placeholder text for now.
Find a Header Image
Your header image stretches across the top of your page, and it stands for your essay everywhere else on the site: the directory, the map, and the homepage. Pick one picture of your topic:
- A photo you take yourself. Hold your phone sideways, so the picture is wider than it is tall, and get the whole building or place in the frame.
- A historical photo from the New Mexico Digital Archive. Search for your topic, open the image, and download the largest size offered.
Then get the file ready:
- It must be a
.jpgor.pngfile. Browsers cannot show.heic, the format many iPhones use. If your file ends in.heic, open it in Preview on a Mac and chooseFile>Export, withJPEGas the format. - Rename it in lowercase with hyphens, keeping the extension:
mesa-vista-hall-today.jpg. - Write down where it came from. For your own photo, that is
Photograph by Your Name, October 2026.For an archive image, it is the collection name and the item’s title or number.
Categories
Use one of these categories, typed exactly as shown. An essay with any other category does not appear in the directory, so if none fits, ask your instructor.
Academic BuildingAdministrationArts VenueAthleticsCampus ServicesClassroom BuildingDiningDormitoryHistoric BuildingLandscapeMuseumOfficePublic ArtStudent Resource
The current Campus History directory is generated from essay metadata.
Change the Top of index.md
- Upload your image. In the web editor, drag the file from your computer onto your folder in the file list, or right-click your folder and choose
Upload.... The image should appear inside your folder, next toindex.md. - Open your essay. Click
index.mdin your folder. The lines between the two---lines at the top are the metadata. The starter marks the five lines to change now. - Change the five lines. Replace only the text after each colon:
title:your topic, such asMesa Vista Hallauthor:your namecategory:one from the list of categories, typed exactlyheader-image:your image’s filename, exactly as it appears in the file listheader-caption:where your image came from
- Commit. Open Source Control. The changes should be your image and
index.md. Type a message such asAdd my header imageand clickCommit & Push. -
Check your preview. Wait a minute or two, then open
https://YOUR-USERNAME.github.io/campus-history/essays/your-folder-name/and reload the page. Your image should fill the top of the page, with your title over it, your category just above the title, and your name below it.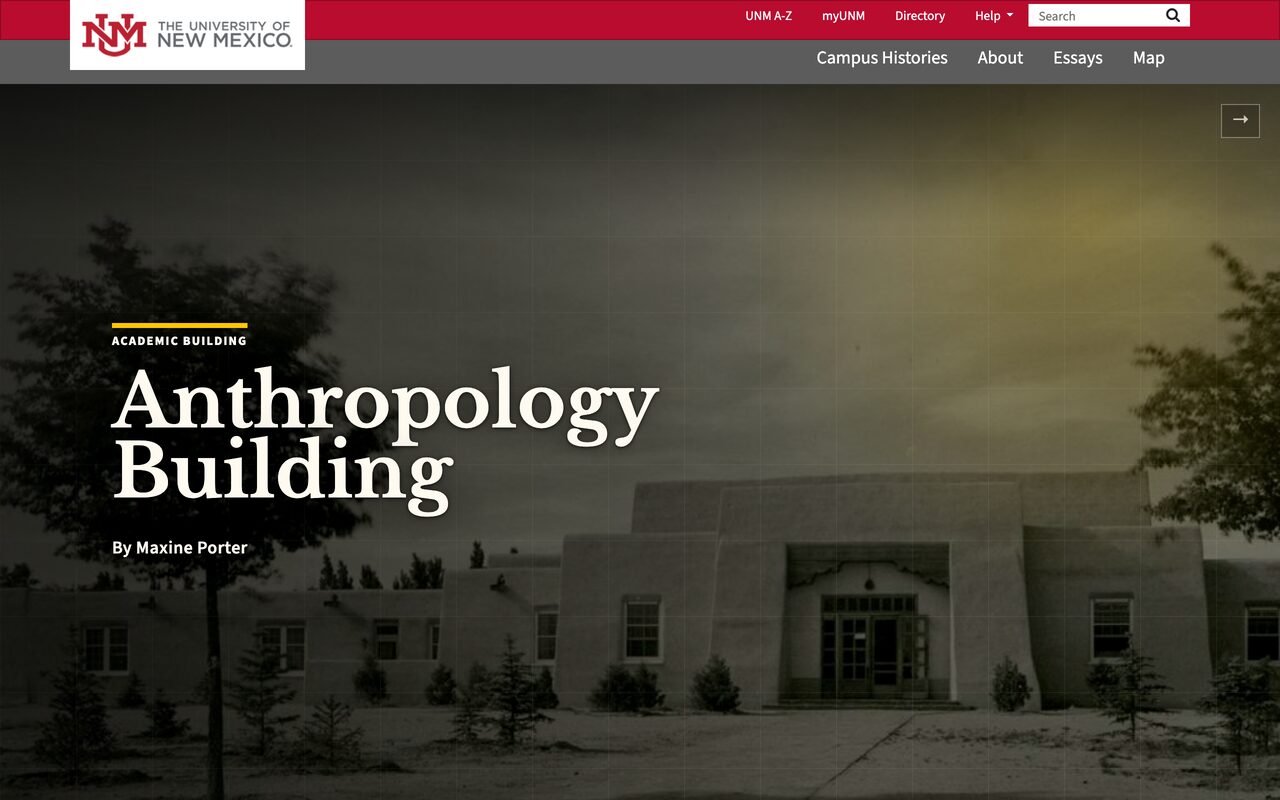
You should see something like this, with your own picture, category, title, and name.
That is a working page of your own. Below the header, it still shows the starter’s placeholder text and sample images until you replace them.
The metadata is easy to break. Keep these rules:
- Do not change anything to the left of a colon, and leave one space after each colon.
- Do not type another colon or a
#in these lines. Use a comma or a dash instead:Mesa Vista Hall, the 400-Man Dorm. - Do not delete either
---line.
If your page loads but its header image, title, and category have disappeared, one of these rules is broken. Look over the lines at the top of index.md, fix the one that breaks a rule, and commit again.
If your page has not changed at all after five minutes, open your fork on github.com and look beside your latest commit. A red ✗, instead of a green check mark, means the site failed to build. Undo your last change, commit again, and ask your instructor if it still fails.
Check Everything Works and Stop
Open your preview site’s Essays page, https://YOUR-USERNAME.github.io/campus-history/directory/. Your essay should be listed under its category, with your building’s picture on its card. If it is, you have finished the work due Tuesday. Stop here.

Your essay’s card should look something like these, under your category’s heading.
- Your essay is not listed. Your
category:line is stillStarter Essay, or it does not match one of the categories exactly. - Your essay is listed, but its picture is missing, broken, or still the starter’s. Your
header-image:line does not match your image’s filename exactly. Compare the two letter by letter, including capitalization and the extension, such as.jpg.
Next
When your instructor tells you to start writing, continue to Part 2: Working on Your Essay.