Contribute a Sketch
Share an experiment or a decision about AI in a class. Tell us what you tried, what happened, and what you’d change. An account of abandoning a tool or keeping AI out of an assignment belongs here too. A few paragraphs is enough to start.
Your sketch is published under your name and licensed CC BY-NC-SA 4.0, like everything else here: others can share and adapt it for noncommercial purposes, with credit to you, under the same license.
For research workflows and experiments, contribute to AI Workbench.
The easy way: just email us
Send a draft to amaranth@unm.edu. A few paragraphs is plenty. It helps if you touch on:
- the task and the course or project it belonged to
- what you tried or decided against, and why
- the prompts you used, if any
- what happened, including an example of the work or a difficulty you encountered
- what you’d change next time
We’ll shape it into a sketch, handle the technical parts, and check the draft with you before it goes live.
Writing a useful teaching sketch
Separate what you asked students to do, what you observed, and what you would change next time. Give a short example showing a judgment students need to make. Label constructed examples clearly; don’t present them as student work. Include prior reading, preparation, and what students submit. A supported account of an unhelpful AI exchange belongs here too.
What the status labels mean
- Rough: an initial proposal or account with important details or questions unresolved; it may have been tried.
- Lightly tested: tried in a limited setting, with little documented follow-up.
- Tested: enough experience is recorded to describe practical findings and limitations.
- Refined: revised in response to use, with changes and remaining limitations documented.
These labels describe experience and revision, not proof of learning or a guarantee that an activity fits another course. Use the label your account supports. The repository’s editorial guide gives the full standard.
The hands-on way: submit through GitHub
The sketchbook runs on GitHub, a free platform for sharing files and hosting websites. If you’d like to build your sketch yourself and see it as a live webpage before sending it to us, here’s how. The email route above works just as well if you prefer it.
1. Create a GitHub account
Go to github.com and sign up. Any email works.
2a. Fork the repository
“Forking” makes your own copy of the site’s files on GitHub. You can edit it freely without touching the live site.
- Go to github.com/amaranth-unm/ai-sketchbook
- Click the Fork button near the top right
- Keep the default settings and name, and click the green
Create forkbutton at the bottom right - The page refreshes within 5–10 seconds
- Check the URL! The page looks the same, but you’re now looking at a repository under your own account
Contributing again later?
If you already have a fork from an earlier sketch, open it and click Sync fork before you start. That brings the site’s newer files into your copy before you edit.
2b. Turn on your preview website
Your fork holds the files that make the website. Now turn on your own copy of the website itself, so you can see your sketch as a webpage instead of a text file.
- Click the
Settingstab near the top of the page - Click
Pagesin the left menu - Under Branch, change
Nonetomain - Click
Save - Click the
Codetab to get back to your repository’s home page
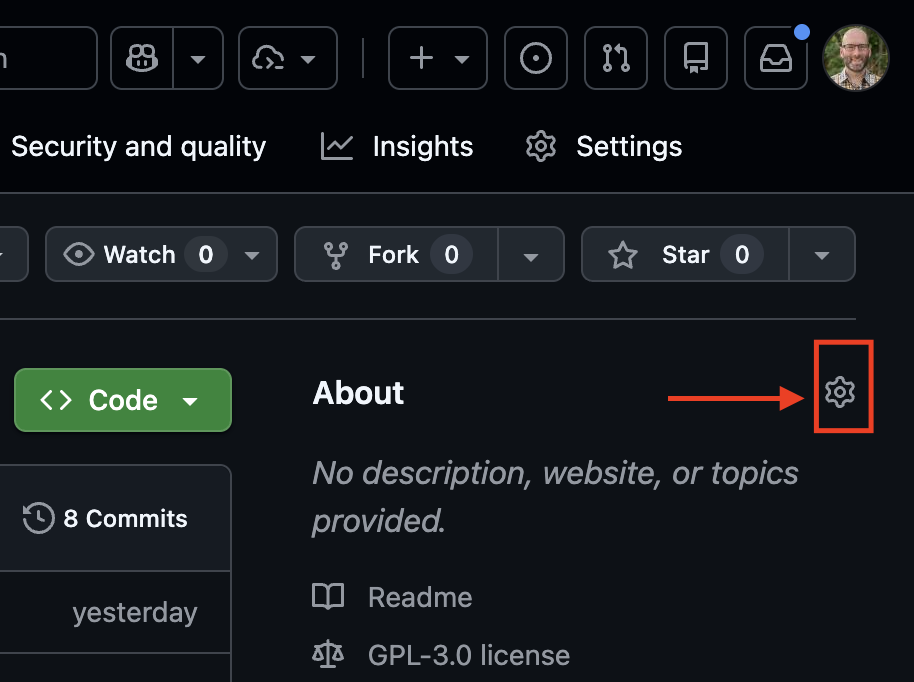
The gear icon next to About sets your website URL.
- Click the gear icon near the upper right
- Check the box for “Use your GitHub Pages website” and click
Save changes - The link that appears next to the gear now goes to your preview site
3. Open the editor
From your fork’s Code tab, press the . (period) key. A full text editor opens in your browser, with nothing to install.
For this task, you’ll use the list of files on the left and the editor on the right.
4. Create your sketch file
The teaching folder has a _sketch-template.md file, already set up with the right fields and comments marking what’s required and what’s optional. Don’t edit the template itself; copy it.
- In the file list, open the
teachingfolder - Right-click
_sketch-template.mdand choose Copy, then right-click the same folder and choose Paste - Rename the copy in lowercase with dashes and no leading underscore, like
citation-test.mdormy-activity.md. (A leading underscore tells the site not to publish a file, which is why the template never appears on the live site.) - Open your new file and follow the instructions at the top: fill in the front matter, delete the “before you start” line, and write your sketch
Put your name and department in the author field, like "Jane Doe, Anthropology". That’s how you’re credited on the page and in its suggested citation. Fill in context (the course where you ran it) and last-run (the term) too, and add a handout link if the student-facing assignment is online.
Adding images: drag image files from your computer into the teaching/images folder in the file list. Then refer to them as images/your-file.jpg, for example in the thumbnail field.
5. Commit your changes
Your edits save as you go, but you need to send them to your repository on GitHub, which rebuilds your preview site.
- Click the branch icon in the left sidebar (it looks like a small network diagram)
- Type a short message describing your change, like “add citation-test sketch”, and click Commit & Push
6. Check your site
The rebuild takes a minute or two.
- Go to your repository’s
Codetab - Click the URL at the top of the
Aboutpanel on the right - Find your sketch and check that it looks right
If your changes don’t appear after a few minutes, click the Actions tab. A red ✗ means something in your file broke the build, often a stray quotation mark in the front matter or an include that lost its closing %}. Compare your file with the template, or email us and we’ll sort it out.
7. Submit your sketch
Go back to your fork at github.com/YOUR-USERNAME/ai-sketchbook.
- Click Pull requests near the top
- Click New pull request
- Click Create pull request
- Add a short note and click Create pull request again
That sends your sketch to us for review. We’ll either merge it into the live site or send you feedback. By submitting, you agree to publish it under the site’s CC BY-NC-SA 4.0 license.
Questions?
Email amaranth@unm.edu. We’re happy to help you get unstuck at any step.